Editor related
Unity defines some
symbols that you can use in your scripts, for example to have slightly
different code on different platforms, or to run some code only inside or
outside of the editor, like this:
#if UNITY_EDITOR
language = "French"; // TESTING
#else
language = UnityEngine.Application.systemLanguage.ToString();
#endif
At some point, you're probably
going to need to define your own symbols, which you can do in the Player
Settings, under Other Settings | Configuration | Scripting Define Symbols.
The important thing to remember
is: when you modify these defines, you must validate your changes by pressing
the Enter key; you should then see a little rotating progress circle in the
bottom right corner of Unity's window, that indicates the scripts are being recompiled
with the updated defines. If you don't press Enter, your changes won't get
saved, and they won't have any effect when you re-run your game.
If you write a script that
requires the object it will be attached to to have some specific components, you
can declare it like this:
[RequireComponent(typeof(MeshFilter),
typeof(MeshRenderer))]
public class TurtleUITexts : MonoBehaviour
When you drag and drop the script
to apply it to an object, the specified components will automatically be added
by the editor if they're not already present. However, keep in mind that if the
script is already attached to some objects when you add the RequireComponent
attribute, those objects will not get modified, this process only happens when
the script gets attached.
A nice feature I only discovered
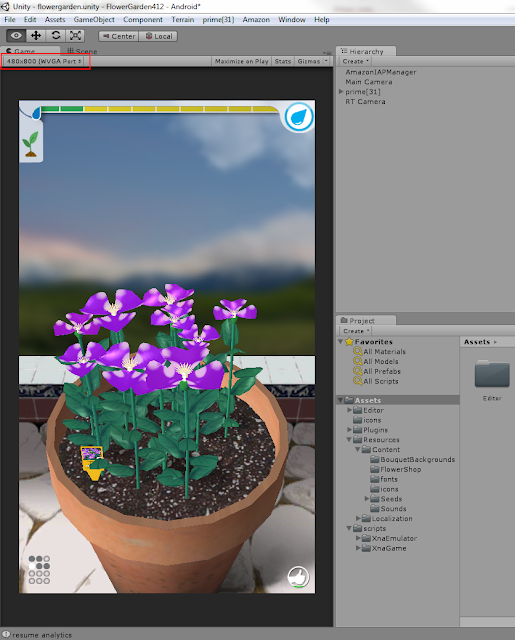
recently is the "size and ratio" drop down menu of the Game view. It
allows you to see what your game looks like at some specific resolutions, and
you can add your own to the predefined ones. If you're working on mobile, you will
get both portrait and landscape options. I find 480*800 (WVGA) works very well
with my window layout, I just have to make the game view slightly bigger than
that to minimize the borders, and I'm all set.
I usually work on a PC desktop,
but after a while I wanted to show Noel where I was at, so, I copied the Unity
project to my laptop, made a Mac standalone build, ran it for a few seconds to
make sure it launched OK, and sent it. When I got some feedback, I was very
surprised to read everything was good, except for the textures looking low res.
I checked on my laptop, and indeed the game wasn't looking as good as on the
desktop, although the code and assets were exactly the same. If this happens to
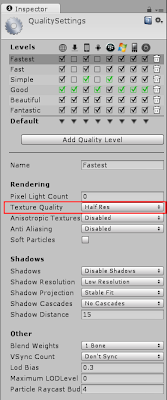
you, here is where you should go first: Edit | Project Settings | Quality.
On the above screenshot, you can
see that texture resolution is divided by 2 for the Fastest quality setting
(selected at the top), that was my problem (either it was the default for Mac standalone
when I built, or my laptop sucks). You can also notice shadows are completely disabled for that
setting, there is no per pixel lighting (Pixel Light Count = 0), etc. When you
select a line in the quality Levels matrix (at the top), the Game view will
reflect these settings immediately, which is great.
The other day I was having some
trouble setting the dimensions of a standalone PC app, I wanted my window to be
480*800 like on a WVGA phone, but somehow the app kept reusing some values I
had used previously (I think I submitted a bug about that a while back).
Anyway, since I couldn't get it to work from the player settings, I decided to
hack the values wherever they were saved. Problem is: where does Unity save
them? On Windows 7 at least, it's not in a text configuration file under some c:\Users\myUserName\
folder like I was expecting it, those settings are stored into the Windows
registry. Or maybe I should say "the dreadful registry", since I
personally hate this thing. Anyway, there it is: if you need to edit those
settings, or nuke them, on Windows, regedit is your guy.
Testing and debugging
Debug.Log (in the UnityEngine
namespace) is your friend. If you're working on a fairly big project and not
using it, I don't know how you're doing it, especially on mobile. When playing
the game in the editor, messages go to the console window, when playing on a
phone they go to its logs (see "Android" section below to read the logs on Android). If you plan
on removing all the messages before you publish your game, simply put your
calls to Debug.Log inside a define, that you enable or disable from the player
settings.
#if DEBUG_INFO
UnityEngine.Debug.Log("unsupported
language => fall back to English");
#endif
This is not specific to Unity,
but one thing I find useful when the game is being tested by volunteers is to
have the build/version number displayed in a corner of every screen, so that it
will be visible on screenshots. At some point I was pushing a new build each
day with the latest fixes, it was quite unlikely everybody was always up to
date, and when you get a report saying a problem is still happening, you
certainly need to know what version was being run.
In the same spirit, I would
recommend not silently swallowing (catching and not re-throwing) too many
exceptions during development and testing, even if you're going to do it in the
end. For example, obviously I don't want the game to crash if it cannot find a
save game file for some reason, but I definitely want to know about it if
that's not supposed to ever happen. In this case, Debug.Log won't cut it: it's
fine if I'm the one testing and I'm looking at the logs, but other testers
won't see the messages.
You could use a library for
analytics to send them to a server (which I actually do in Flower Garden when
an exception is caught), but that won't give you much context. For a tricky bug
I had to fix but could not reproduce myself, my solution was to hack a message
dialog class already in the game, and display some information as soon as I
could detect the problem; this way, in addition to the call stack, I also got
some details from the tester in Slovenia regarding what she did just before the
dialog showed up. In future projects, I think I'll reuse this method and
generalize it.
Android
If you're developing on Android,
you should be familiar with adb (the Android Debug Bridge).
It's a program you run in a console (on PC) or terminal (on Mac) window to
communicate with your Android device. It can do a bunch of things (for example:
push or pull files from/to your computer), but mostly you want to use it to
monitor the logs your game spits out while running. This includes the messages
you print from your scripts with Debug.Log, but also some messages from Unity
itself, the plug-ins you may be using, etc. adb is located under the
sdk/platform-tools folder of the Android SDK, and here are the most useful
commands:
see messages coming from Unity: adb logcat -s Unity
clear the logs: adb logcat -c
If for some reason you wanted to
run your Android game in the emulator, maybe to see what it looks like in a
different resolution than the ones of your devices, or with another version of
the Android OS, I believe you're out of luck. The first problem is: the ARM
emulator that comes with the SDK is still as slow as when I used it in 2011,
and I doubt you'll be able to stand the pain for long. There are a few
alternatives, I tried the x86 one from Intel, I was indeed able to run my old native game Jigsaw Guru on
it, and the performance is pretty decent. However, you cannot use it for Unity projects,
apparently because the engine's compiled libraries are only available in ARM format.
(see Unity\Editor\Data\PlaybackEngines\androidplayer\libs)
Sometimes you may need to look at
your program's manifest, usually to check all the permissions your project
requires are included. This is easy: build the apk from Unity, then open
AndroidManifest.xml under the Temp/StagingArea folder.
Windows Phone
I just started using the Windows
Phone add-on, and initially I got what looked like immediate crashes after the
splash screen when using "Build and Run" in Unity, and with
"Build" Visual Studio would crash trying to open the solution
generated by Unity. To fix all of the above, I just had to make sure I was on
the latest everything: I installed some Windows updates, replaced Unity 4.2.2
with 4.3.1, and got the Visual Studio 2012 update 4 - I think the latter was
actually the missing piece. After that, no problem, everything works as
advertised, great :)
I'm still using MonoDevelop for
now to write scripts, and I always compile them there to fix errors before
switching back to Unity. The C# projects generated by Unity are configured to
use .NET 3.5 by default, which is not installed on Windows 8. In MonoDevelop,
you can change their settings to use .NET 4.0 instead, but this will get
overwritten each time the projects get recreated. So, do yourself a favor, and install .NET 3.5,
it's straightforward and quick.
This is not specific to Unity,
but if you haven't done any Windows Phone development before, you probably
don't know the .NET version used on this platform doesn't implement all the
namespaces and classes you're used to. I forgot about it too, and the Flower
Garden code base for Android required a few changes to run on WP8. For example,
XmlDocument and its associated classes (XmlNode, XmlAttribute) isn't there to
load and parse xml files, you need to use XDocument / XElement / XAttribute
instead.
File.WriteAllBytes(somePath, byteArray) isn't supported, you have to
do something like this:
using (var stream = File.Open(somePath, FileMode.Create))
{
using (BinaryWriter
writer = new BinaryWriter(stream))
{
writer.Write(byteArray);
}
}
Mecanim
This is not related to Flower
Garden, but I tried Mecanim recently, and here are a couple of things that gave
me trouble. Once you know about them, things become easier.
I started with the robot
character from this Mecanim
tutorial, and tried to add a run animation to it. No dice, until I
changed the type of the animation to 'humanoid', under the Rig tab of its
import settings. Obviously that makes sense, for the robot has that type as
well, but since I was attempting to apply the animation to the robot, you would
think Mecanim would figure out the types needed to match, or at least give me
an error about it in the console.
Then I wanted my animation to
loop. When selecting the corresponding state in the Animator window, you see a
few parameters for the animation, such as its replay speed:
But where is the "loop"
checkbox? It turns out looping or not needs to be decided when importing the
animation, as shown below. Whether that is intuitive and convenient or not to
have this setting here is another story.


No comments:
Post a Comment
Note: Only a member of this blog may post a comment.