Monday, December 16, 2013

A few tips for Unity I learned while porting Flower Garden (2/2)

Editor related


Unity defines some symbols that you can use in your scripts, for example to have slightly different code on different platforms, or to run some code only inside or outside of the editor, like this:

#if UNITY_EDITOR
            language = "French";  // TESTING
#else
            language = UnityEngine.Application.systemLanguage.ToString();
#endif       


At some point, you're probably going to need to define your own symbols, which you can do in the Player Settings, under Other Settings | Configuration | Scripting Define Symbols.


The important thing to remember is: when you modify these defines, you must validate your changes by pressing the Enter key; you should then see a little rotating progress circle in the bottom right corner of Unity's window, that indicates the scripts are being recompiled with the updated defines. If you don't press Enter, your changes won't get saved, and they won't have any effect when you re-run your game.


If you write a script that requires the object it will be attached to to have some specific components, you can declare it like this:

[RequireComponent(typeof(MeshFilter), typeof(MeshRenderer))]
public class TurtleUITexts : MonoBehaviour

When you drag and drop the script to apply it to an object, the specified components will automatically be added by the editor if they're not already present. However, keep in mind that if the script is already attached to some objects when you add the RequireComponent attribute, those objects will not get modified, this process only happens when the script gets attached.


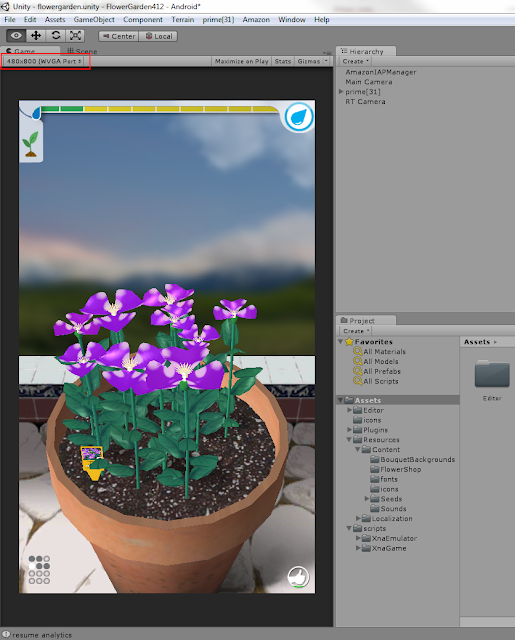
A nice feature I only discovered recently is the "size and ratio" drop down menu of the Game view. It allows you to see what your game looks like at some specific resolutions, and you can add your own to the predefined ones. If you're working on mobile, you will get both portrait and landscape options. I find 480*800 (WVGA) works very well with my window layout, I just have to make the game view slightly bigger than that to minimize the borders, and I'm all set.


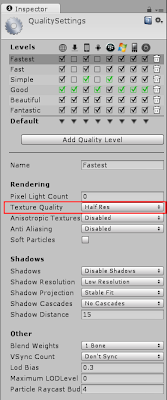
I usually work on a PC desktop, but after a while I wanted to show Noel where I was at, so, I copied the Unity project to my laptop, made a Mac standalone build, ran it for a few seconds to make sure it launched OK, and sent it. When I got some feedback, I was very surprised to read everything was good, except for the textures looking low res. I checked on my laptop, and indeed the game wasn't looking as good as on the desktop, although the code and assets were exactly the same. If this happens to you, here is where you should go first: Edit | Project Settings | Quality. 


On the above screenshot, you can see that texture resolution is divided by 2 for the Fastest quality setting (selected at the top), that was my problem (either it was the default for Mac standalone when I built, or my laptop sucks). You can also notice shadows are completely disabled for that setting, there is no per pixel lighting (Pixel Light Count = 0), etc. When you select a line in the quality Levels matrix (at the top), the Game view will reflect these settings immediately, which is great.


The other day I was having some trouble setting the dimensions of a standalone PC app, I wanted my window to be 480*800 like on a WVGA phone, but somehow the app kept reusing some values I had used previously (I think I submitted a bug about that a while back). Anyway, since I couldn't get it to work from the player settings, I decided to hack the values wherever they were saved. Problem is: where does Unity save them? On Windows 7 at least, it's not in a text configuration file under some c:\Users\myUserName\ folder like I was expecting it, those settings are stored into the Windows registry. Or maybe I should say "the dreadful registry", since I personally hate this thing. Anyway, there it is: if you need to edit those settings, or nuke them, on Windows, regedit is your guy.


Testing and debugging


Debug.Log (in the UnityEngine namespace) is your friend. If you're working on a fairly big project and not using it, I don't know how you're doing it, especially on mobile. When playing the game in the editor, messages go to the console window, when playing on a phone they go to its logs (see "Android" section below to read the logs on Android). If you plan on removing all the messages before you publish your game, simply put your calls to Debug.Log inside a define, that you enable or disable from the player settings.

#if DEBUG_INFO
            UnityEngine.Debug.Log("unsupported language => fall back to English");
#endif


This is not specific to Unity, but one thing I find useful when the game is being tested by volunteers is to have the build/version number displayed in a corner of every screen, so that it will be visible on screenshots. At some point I was pushing a new build each day with the latest fixes, it was quite unlikely everybody was always up to date, and when you get a report saying a problem is still happening, you certainly need to know what version was being run.


In the same spirit, I would recommend not silently swallowing (catching and not re-throwing) too many exceptions during development and testing, even if you're going to do it in the end. For example, obviously I don't want the game to crash if it cannot find a save game file for some reason, but I definitely want to know about it if that's not supposed to ever happen. In this case, Debug.Log won't cut it: it's fine if I'm the one testing and I'm looking at the logs, but other testers won't see the messages.

You could use a library for analytics to send them to a server (which I actually do in Flower Garden when an exception is caught), but that won't give you much context. For a tricky bug I had to fix but could not reproduce myself, my solution was to hack a message dialog class already in the game, and display some information as soon as I could detect the problem; this way, in addition to the call stack, I also got some details from the tester in Slovenia regarding what she did just before the dialog showed up. In future projects, I think I'll reuse this method and generalize it.


Android


If you're developing on Android, you should be familiar with adb (the Android Debug Bridge). It's a program you run in a console (on PC) or terminal (on Mac) window to communicate with your Android device. It can do a bunch of things (for example: push or pull files from/to your computer), but mostly you want to use it to monitor the logs your game spits out while running. This includes the messages you print from your scripts with Debug.Log, but also some messages from Unity itself, the plug-ins you may be using, etc. adb is located under the sdk/platform-tools folder of the Android SDK, and here are the most useful commands:

see messages coming from Unity: adb logcat -s Unity
clear the logs: adb logcat -c


If for some reason you wanted to run your Android game in the emulator, maybe to see what it looks like in a different resolution than the ones of your devices, or with another version of the Android OS, I believe you're out of luck. The first problem is: the ARM emulator that comes with the SDK is still as slow as when I used it in 2011, and I doubt you'll be able to stand the pain for long. There are a few alternatives, I tried the x86 one from Intel, I was indeed able to run my old native game Jigsaw Guru on it, and the performance is pretty decent. However, you cannot use it for Unity projects, apparently because the engine's compiled libraries are only available in ARM format.
(see Unity\Editor\Data\PlaybackEngines\androidplayer\libs)


Sometimes you may need to look at your program's manifest, usually to check all the permissions your project requires are included. This is easy: build the apk from Unity, then open AndroidManifest.xml under the Temp/StagingArea folder.


Windows Phone


I just started using the Windows Phone add-on, and initially I got what looked like immediate crashes after the splash screen when using "Build and Run" in Unity, and with "Build" Visual Studio would crash trying to open the solution generated by Unity. To fix all of the above, I just had to make sure I was on the latest everything: I installed some Windows updates, replaced Unity 4.2.2 with 4.3.1, and got the Visual Studio 2012 update 4 - I think the latter was actually the missing piece. After that, no problem, everything works as advertised, great :)


I'm still using MonoDevelop for now to write scripts, and I always compile them there to fix errors before switching back to Unity. The C# projects generated by Unity are configured to use .NET 3.5 by default, which is not installed on Windows 8. In MonoDevelop, you can change their settings to use .NET 4.0 instead, but this will get overwritten each time the projects get recreated. So, do yourself a favor, and install .NET 3.5, it's straightforward and quick.


This is not specific to Unity, but if you haven't done any Windows Phone development before, you probably don't know the .NET version used on this platform doesn't implement all the namespaces and classes you're used to. I forgot about it too, and the Flower Garden code base for Android required a few changes to run on WP8. For example, XmlDocument and its associated classes (XmlNode, XmlAttribute) isn't there to load and parse xml files, you need to use XDocument / XElement / XAttribute instead.

File.WriteAllBytes(somePath, byteArray) isn't supported, you have to do something like this:

using (var stream = File.Open(somePath, FileMode.Create))
{
    using (BinaryWriter writer = new BinaryWriter(stream))
    {
              writer.Write(byteArray);
    }
}


Mecanim


This is not related to Flower Garden, but I tried Mecanim recently, and here are a couple of things that gave me trouble. Once you know about them, things become easier.

I started with the robot character from this Mecanim tutorial, and tried to add a run animation to it. No dice, until I changed the type of the animation to 'humanoid', under the Rig tab of its import settings. Obviously that makes sense, for the robot has that type as well, but since I was attempting to apply the animation to the robot, you would think Mecanim would figure out the types needed to match, or at least give me an error about it in the console.

Then I wanted my animation to loop. When selecting the corresponding state in the Animator window, you see a few parameters for the animation, such as its replay speed:


But where is the "loop" checkbox? It turns out looping or not needs to be decided when importing the animation, as shown below. Whether that is intuitive and convenient or not to have this setting here is another story.


Monday, December 9, 2013

A few tips for Unity I learned while porting Flower Garden (1/2)

Using two versions (or more) of Unity on your computer


By default, when you install a new version of Unity, it replaces the current one. But it is actually possible to keep more than one version on your computer, which is useful if you're working on a project and don't want to upgrade immediately, while still being able to try and test the latest features. For example, when I was finishing to port Flower Garden to Android, and getting ready to publish it, I kept using 4.1.2 since it was stable and the next versions introduced some bugs I could not work around; but at the same time I was also getting those versions, to check if there were some improvements the game could benefit from in the future, and verify what the status was on those aforementioned bugs.

Keeping several versions is not difficult: before installing a new one, you just have to rename the folder containing the current one, et voila. For example, on Windows 7, I have the older version in c:\Program Files (x86)\Unity4.1.2, and the newer one in c:\Program Files (x86)\Unity. To run the current version, I use the usual Unity icon; to launch the old one, I suppose I could create another icon, but I got into the habit of opening a command window, navigating to the desired folder, and launching Editor\Unity.exe.

By default, Unity reloads the last project you worked on; but if that was a 4.1.2 project, and you're launching 4.3, you don't want this behavior since your project would be converted to 4.3 and you may not be able to load it in 4.1.2 anymore. Fortunately, Unity warns you about it. One solution is to specify what project you want to open, like this:

Editor\Unity.exe -projectPath myProject

Or, you can also use a project name that does not exist, and Unity will bring up the Project Wizard dialog. However, the easiest way to solve the issue is to go to Edit\Preferences\General in Unity's menu, and check Always Show Project Wizard once and for all.


When you go back and forth between versions of Unity and projects like this, it is possible that after loading your scene looks empty and your hierarchy tab only contains the Main Camera; do not panic, somehow the scene selection got lost, and you just have to find and double click your scene in the Project tab to bring everything back to normal.


Version control


As soon as you start working on a project, you should put it under version control, so that you can go back in time and check the changes you made even weeks ago if something goes wrong, or merge with other people's changes if you're part of a team. In its initial configuration, Unity is very unfriendly with external version control systems (by "external" I mean: anything other than the Unity Asset Server, which is a separate paid product): it creates lots of binary files in the Library folder, mostly under Library\metadata, and there is no way to know which ones need to be checked in. Even if there was, that wouldn't be very useful, since binary files cannot be merged, and looking at differences tells you nothing.

Fortunately, some version of Unity introduced a setting that will make your life easier: go to Edit\Project Settings\Editor, and in the inspector, under Version Control, select the Visible Meta Files mode. Ideally you should do that before you create anything in your project, otherwise you probably want to quit Unity so that the magic happens. Basically, once you're in this mode, every file under the Assets folder will generate a new file of the same name with an additional ".meta" extension, that contains some information about the corresponding asset. For example, the values of the parameters you can edit in the inspector for one of your textures. These meta files are text files, therefore it becomes possible to diff and merge them.


This is great for most assets, but it's not a silver bullet: scenes and prefabs are still stored in binary files, and cannot be merged if two people modify them around the same time. For more information, see the following links:


Scripting and rendering


If you load resources with Resources.Load, you need to know it doesn't like backslashes in its file path, only forward slashes should be used. This is especially annoying on Windows, where backslash is the character used by Path.Combine to concatenate strings. Therefore, don't forget to do something like: string filename = Path.Combine(ContentRoot, name).Replace("\\", "/");

Since the geometry in Flower Garden is procedurally generated, and although it could still have been stored in game objects, I didn't feel the need to use mesh renderers and mesh filters: instead, I call the lower level Graphics.DrawMeshNow function, that takes a mesh and a matrix. Since I was taking that path, I thought I could do all the processing and rendering of a single frame from the Update function of my main script, pretty much the same way it works in the iOS version. That's not the case though: rendering doesn't work in Update, because the camera hasn't been set up yet and the frame buffer cleared, etc. OnRenderObject was the right place for me, OnRenderImage and OnPostRender are also worth checking out if you're thinking of doing some "manual rendering".

At some point, I wanted to apply a specific change to all the textures in my project, and I thought: Unity sure knows who they are, and has all the code needed to load them, so why not write a C# script, attach it to the main camera, and launch the game in the editor once to run the code I'll put in the Start function? That sounded clever, until I realized most of my textures were compressed and read only (most of yours probably are too), and I needed them uncompressed and writeable in order to process them. No problem, a quick search in the forums told me how to retrieve the corresponding texture importers, and change their properties before loading the textures the way I wanted them. Problem is: when you do that, you don't work on copies of the importers, you really modify "the real thing", and after happily running the game, you soon notice you lost all your texture compression settings. So: be careful, and use version control so that you can revert those unwanted changes.

Shaders in Unity are a strange beast, at least at first. I've written simple shaders before, in assembly and HLSL, but when I started looking for examples to do it in Unity, it seemed like there were 3 different ways to do it, which I found confusing. My understanding is: you can use commands to rely on color combiners and the fixed function pipeline, or write Cg code, or use some kind of meta programming that will allow your shader to work correctly with Unity's lights in both rendering modes (forward and deferred). Anyway, the thing I want to point out is a bunch of rendering states (for example: writing to the z-buffer or not, changing its test mode, setting the blending mode, back-face culling, etc) are hard coded in the shader, and I did not find a way to turn them into parameters I could set from script. I can see why it was done like this, but it means each time I want to reuse a shader with one or more rendering states having a different value than before, I need to duplicate the shader. Not a huge deal in my case, but that's how Flower Garden ends up having 23 shaders (which I'm sure you would not guess by looking at it).

When assigning data to a Mesh, it seemed using null was not a good idea (I haven't verified it recently, this may have changed). For example, if your data doesn't contain texture coordinates, don't do mesh.uv = null; (that would trigger an error), just leave that array alone. Same thing for normals, etc. I can only assume mesh.uv (in my example) references a zero-sized array by default, and replacing it with null prevents the engine from getting its length, or something like that.


Making builds


Creating builds may fail on some platforms if some of your files are read only (for example, if you're using Perforce for version control, and haven't checked those files out). The one I know of from the top of my head is AndroidManifest.xml, that gets copied to Temp\StagingArea during the build and needs to be writable to get modified.

Code stripping is not as smart as you may think. This Pro-only feature, found in the Player Settings under Optimization | Stripping Level (for some platforms only), is meant to reduce the size of your executable (and therefore the size of the file people will download to play your game) by removing some libraries your script code is not using. Ideally, this would mean that after the compiler has done its job, the build process would figure out what classes or dll's are required, and get rid of the rest (which is pretty much was this page says:
http://docs.unity3d.com/Documentation/Manual/iphone-playerSizeOptimization.html).

In reality, at least on Android, this is not what happens: it looks like a predefined list of classes, that are supposed to not be used very often by most developers, is simply excluded from the build, without any further test. I believe encryption classes are part of this list, and HttpWebRequest most definitely is: when I tried to enable code stripping in Flower Garden, the game would crash as soon as a script tried to use this class, that could not be found anymore (and no, I am not accessing it through reflection). One problem is: I don't use that class a lot, therefore I did not notice the crashes immediately, and when I got one it took me a while to realize code stripping was the culprit. No compiler error, no error when building, it's nasty. When I finally understood the issue, I had 2 options: disable code stripping, or rewrite the scripts that used the missing class in a different way; since I was getting close to publishing the game, and had 100 other little things left to do, you can guess which solution won.

Since then, I learned there is a third option: you can create a link.xml file under the Assets folder, and specify in it some namespaces that should be included in (or: not excluded from) the build. I haven't tried it yet, which is why I'm borrowing the encryption example I found (warning: use at your own risk), instead of following up with HttpWebRequest. It's good to have this workaround, but it still looks to me like I'm doing the job of the computer, that should be able to figure these things out much better than me.

<linker>
 <assembly fullname="mscorlib">
 <namespace fullname="System.Security.Cryptography" preserve="all"/>
 <namespace fullname="System.Security.Cryptography.X509Certificates" preserve="all"/>
 </assembly>
</linker>


To Be Continued...

Monday, December 2, 2013

Time flies

I recently noticed my last post on this blog was over 2 years old; seriously? Maybe it's time to catch up then, before I try blogging about some topics I've been interested in lately.


Full time job 


This is one lame excuse for stopping to write in 2011: after publishing my second game on Windows Phone 7 and Xbox Live Indie Games, I had to take a full time job and go back to working in an office rather than my apartment. I actually joined some of my former colleagues from High Moon Studios at Zynga San Diego, where I wrote server and client code for the web versions of Cafe World, Bubble Safari, Bubble Safari Ocean, and Ninja Kingdom.


I learned a lot in the process since I didn't know anything about Facebook games, PHP (on the server side) or ActionScript (on the client side) when I started, and I got to see what it's like to run a live game that reached 7M daily active users around June 2012 (Bubble Safari), and update it several times a week to keep the players happy and busy. I also got to renew my collection of free mugs and free shirts, but that's another story ;)


Personal projects


I had bought a MacBook Pro a couple of weeks before I started at Zynga, and although the new job was keeping me plenty busy, I began porting my game Jigsaw Guru to iOS in my spare time. The idea was to learn the platform and some Objective C, I wasn't planning on making any money with this project since there are tons of jigsaw puzzle games on the iPhone. This turned out to be even more true than I could imagine: despite getting more downloads than I expected (nothing spectacular though, about 14k), I haven't seen a single cent because I went with Mobclix for in-game ads, and they simply stopped paying developers around the time I published on the AppStore. Fortunately I'm not losing much, but still; I've never had any problem with Microsoft's PubCenter on Windows Phone 7, or Smaato on Android, but I would obviously recommend avoiding Mobclix and Velti (the company that bought them) like the plague.

Since I talked about downloads, here is a strange fact: when I published Jigsaw Guru on iOS, and although it didn't make much noise at all, I saw a significant bump in the number of installs... on Android! It cannot be a coincidence, the two dates match exactly. This makes no sense to me, I don't know how these people suddenly saw a game that had been on Google Play for 20 months already, it's a mystery. Oh well.


Porting Jigsaw Guru took me a bit more than a year, since there were a few periods when I was not touching it for weeks. I also spent some time playing with a free trial of Unity Pro, and once Jigsaw Guru got out of the way, I started converting Flower Garden to C#.


Flower Garden


Flower Garden is an iOS game that, even if you never saw it at the top of the most important charts, has had a lot of success since it was created and published on the Appstore in 2009 by my friend Noel Llopis. It had not been ported to any other platform yet, and after verifying Unity should ease the pain of developing on Android, I decided to tackle that challenge. There was a lot of work to be done: the code base is about 3 times bigger than Jigsaw Guru's, understanding somebody else's code is slower, I had to replace UIKit with something else, make sure everything on screen would scale properly on the many different resolutions available on Android, and of course performance and stability have to be solid. As porting Jigsaw Guru already took over a year, this would have been an endless spare time project; but since I wanted to try being indie again at some point, after a few months I took a risk and quit my job to work on it full time.

Development took more time than I estimated (I know: what a surprise!), and I learned a bunch of things once again. For example, this is the first time I use in-app purchases, which definitely require a bit more code (for the shop) than ads. The game was published worldwide on Google Play at the end of October, and a few days later on Amazon. So far, it hasn't been doing too well: it's completely invisible in the store, very hard to find even knowing its exact name (!), and therefore downloads are increasing very slowly in both stores. Ratings are good though, so, hopefully Noel and I can figure something out, or get lucky.


Anyway, that's all I wanted to cover this time, and as you can guess there is a good chance I'll talk about Unity and Android development (with Unity) in my next posts.